[DuckDB] Push-Based Execution Model
Table of Contents
1. 背景 #
DuckDB 是我非常喜欢的一个数据库,它基于 libpg_query 实现了 SQL Parser,语法和 PostgreSQL 一致,内嵌 SQLite 的 REPL CLI,编译好后可直接运行 CLI 交互式输入 SQL 得到结果。架构简单、分析性能优秀、代码干净好读,极易上手。
10 月初偶然间翻看 duckdb 的代码,发现他的执行引擎和计算调度采用了类似 Hyper 在《 Morsel-Driven Parallelism: A NUMA-Aware Query Evaluation Framework for the Many-Core Age》中提出的 Morsel-Driven 的方式,实现了 push-based execution model,它的 pipeline breaker 语义和也 Hyper 在《 Efficiently Compiling Efficient Query Plans for Modern Hardware》 中定义的一致,不同的是 Hyper 期望通过 LLVM JIT 的方式对数据一行一行计算使其尽量保存在寄存器中,DuckDB 采用向量化使一批数据尽可能保存在 CPU Cache 中。
之前做 TiDB 时研究过很多 Hyper 和 Vectorize 的论文,也做过几次分享,一直希望实现一个简单 demo 验证下效果,正好 DuckDB 采用了类似实现,这就勾起了我浓烈的好奇心。因此利用周末时间研究了下 DuckDB 是如何实现 push-based execution model 的,这里分享给大家,希望帮助到同样感兴趣的朋友们。
2. 执行框架概览 #
DuckDB 启动时会创建一个全局的 TaskScheduler,启动 nproc-1(main 函数)个后台线程。这些后台线程启动后会不停地从位于 TaskScheduler 的 Task 队列中取出和执行 Task。DuckDB 通过这个后台线程池和公共 Task 队列完成了 Query 的并发执行。
DuckDB 基于 Query 的物理执行计划 PhysicalOperator tree 构造了 Pipeline DAG。每个 Pipeline 代表了物理执行计划中一段连续的 PhysicalOperator 算子,由 source、operators 和 sink 构成。当且仅当 Pipeline 的所有 dependency 都执行完后,该 Pipeline 才可被执行。Pipeline 的 sink 代表了需要消费掉所有输入数据才能对外返回结果的 PhysicalOperator。Pipeline DAG 可以看做是另一种视角下的物理执行计划。
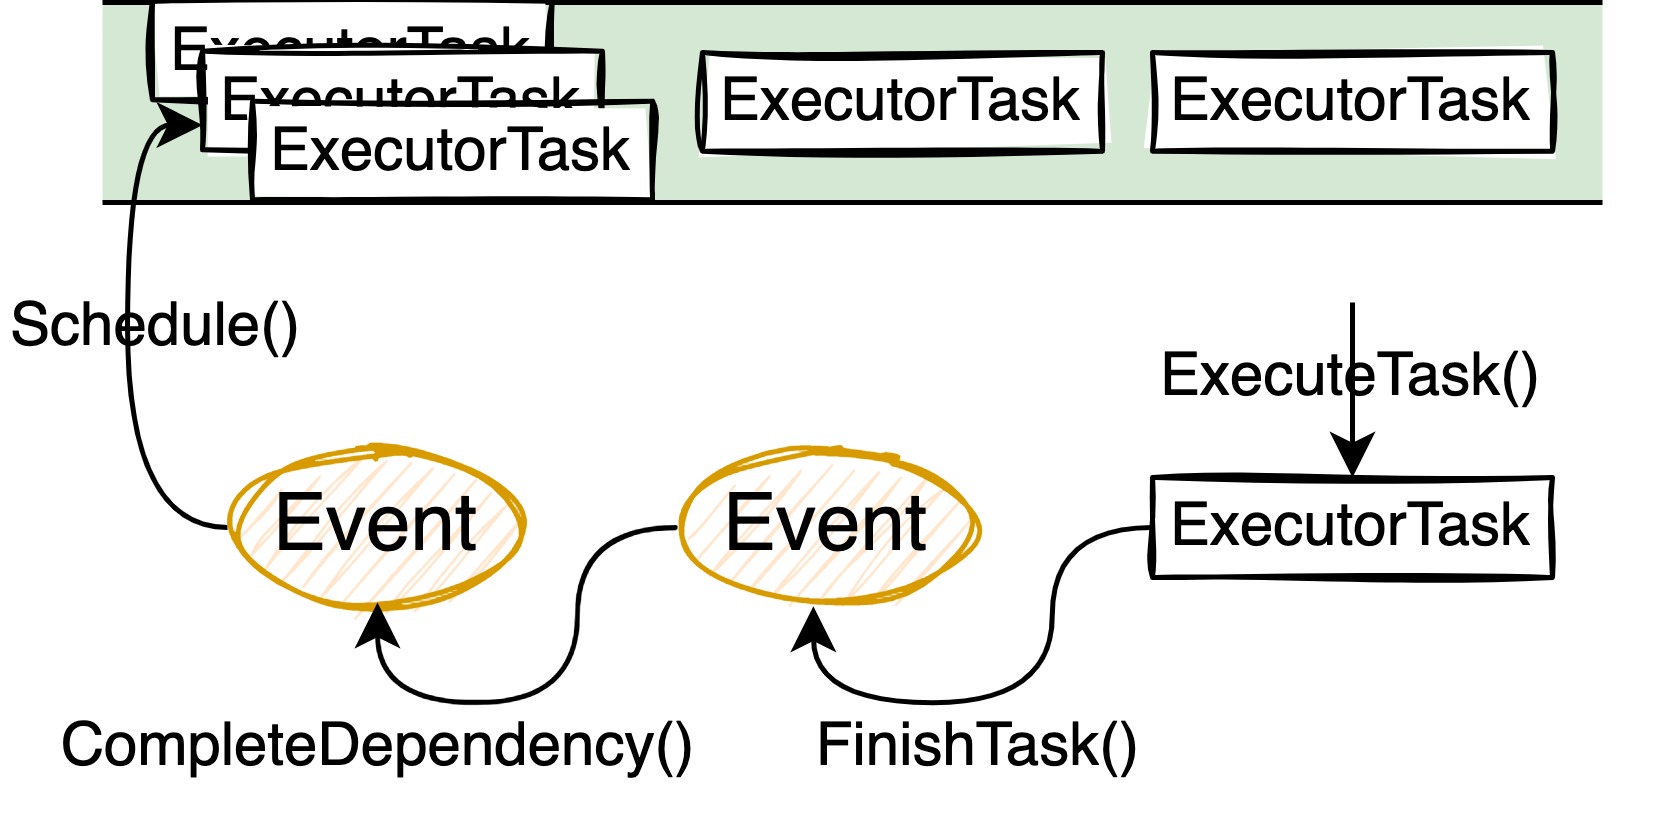
DuckDB 为每个 Pipeline 构造多个 ExecutorTask 使得 Pipeline 可以被多个线程并发执行,Pipeline 的 source 和 sink 需要是并发安全的。后台线程取得 ExecutorTask 后会通过其中的 PipelineExecutor 执行 Pipeline,当执行完一个 ExecutorTask 后,Pipeline 的一个并发任务也就执行完了。
为了正确调度和执行 Pipeline DAG 中所有的 Pipeline 和它们对应的 ExecutorTask,我们需要能够及时知道某个 Pipeline 的所有并发是否都执行完毕,在其父亲 Pipeline 的所有依赖都被执行完后及时调度父亲 Pipeline 的所有 ExecutorTask,DuckDB 采用了 Event 来生成和调度对应的 ExecutorTask。
每个 Pipeline 的 Event 都记录了需要执行的总并发数和完成的并发数。在构造 Pipeline DAG 后,DuckDB 会为其构造一个对应的 Event DAG,Pipeline 通过 Event 完成了 ExecutorTask 的调度和执行。每当一个 ExecutorTask 完成,该 Event 的完成并发数就会加 1,当该 Pipeline 的所有 ExecutorTask 都完成后,Event 中的总并发数和已完成并发数相等,标志着该 Event 也完成,该 Event 会通知其父亲 Event,父亲 Event 一旦检测到所有 dependency Event 都执行完,就会调度自己的 ExecutorTask,从而驱动后续的 Pipeilne 计算。
ExecutorTask 中的 Pipeline 是以 push 的方式执行的:先从 Pipeline 的 source 获取一批数据,然后将该批数据依次的通过所有中间的 operators 计算,最终由 sink 完成这一批初始数据的最终计算。典型的 sink 比如构造 hash table:当前 Pipeline 的所有 ExecutorTask 执行完后,最终的 hash table 才构造好,才能用来 probe 产生结果。
为了返回结果给客户端,当前 Query 的主线程会不断调用 root PipelineExecutor 的 pull 接口。需要注意的是,这个接口名字的 pull 指的仅仅是从最顶层 Pipeline 拿结果数据,在计算顶层 Pipeline 的时候仍然是从 source 到最后一个 PhysicalOperator push 计算过去的。root PipelineExecutor 拿到一批 source 数据代表着 root Pipeline 依赖的所有 PipelineTask 都执行完毕,之后 root PipelineExecutor 内部以 push 的方式执行完这一批数据得到结果,将结果返回给客户端,用户就可以看到 Query 执行结果了。
以上就是 DuckDB 执行框架的大致介绍。因为要特殊考虑一些算子的特殊优化,所以实际实现会稍微复杂一些。比如 UNION ALL,DuckDB 会在一段 PhysicalOperator 链条上构造多个 Pipeline。考虑到 partitioned hash join 的高效实现,DuckDB 也会在一段 PhysicalOperator 链条上构造多个 Pipeline,和 UNION ALL 不同的是,这些 Pipeline 之间有执行顺序的依赖关系。最终构造出来的可能就是有多个 root 的 Pipeline DAG。
本文以当前(2022-11-14)DuckDB master 分支的 commit 为例,学习 DuckDB push-based execution model 涉及到的关键代码路径,感兴趣的朋友可以试试 clone 代码编译和调试玩玩。在 DuckDB 中,Pipeline 的构造、Event 的调度都发生在 Executor::InitializeInternal() 函数中,本文后续的内容也将围绕这里面的关键函数展开,其中几个关键的函数为:
- root_pipeline->Build(physical_plan):top-down 的构造 Pipeline DAG
- ScheduleEvents(to_schedule):基于除了 root Pipeline 以外的其他 Pipeline 构造 Event DAG,完成初始 Event 和 ExecutorTask 的调度。
Executor::InitializeInternal() 函数的完整代码如下:
void Executor::InitializeInternal(PhysicalOperator *plan) {
    auto &scheduler = TaskScheduler::GetScheduler(context);
    {
        lock_guard<mutex> elock(executor_lock);
        physical_plan = plan;

        this->profiler = ClientData::Get(context).profiler;
        profiler->Initialize(physical_plan);
        this->producer = scheduler.CreateProducer();

        // build and ready the pipelines
        PipelineBuildState state;
        auto root_pipeline = make_shared<MetaPipeline>(*this, state, nullptr);
        root_pipeline->Build(physical_plan);
        root_pipeline->Ready();

        // ready recursive cte pipelines too
        for (auto &rec_cte : recursive_ctes) {
            D_ASSERT(rec_cte->type == PhysicalOperatorType::RECURSIVE_CTE);
            auto &rec_cte_op = (PhysicalRecursiveCTE &)*rec_cte;
            rec_cte_op.recursive_meta_pipeline->Ready();
        }

        // set root pipelines, i.e., all pipelines that end in the final sink
        root_pipeline->GetPipelines(root_pipelines, false);
        root_pipeline_idx = 0;

        // collect all meta-pipelines from the root pipeline
        vector<shared_ptr<MetaPipeline>> to_schedule;
        root_pipeline->GetMetaPipelines(to_schedule, true, true);

        // number of 'PipelineCompleteEvent's is equal to the number of meta pipelines, so we have to set it here
        total_pipelines = to_schedule.size();

        // collect all pipelines from the root pipelines (recursively) for the progress bar and verify them
        root_pipeline->GetPipelines(pipelines, true);

        // finally, verify and schedule
        VerifyPipelines();
        ScheduleEvents(to_schedule);
    }
}
3. TaskScheduler 和后台线程池 #
在 DuckDB 启动时会创建一个全局的 TaskScheduler,在后台启动 nproc-1(main 函数)个后台线程,启动线程是在 TaskScheduler::SetThreadsInternal() 函数中进行的,从主线程启动线程池的调用堆栈如下,感兴趣的朋友们可以根据这些关键函数看看线程是如何启动起来的:
(lldb) bt
* thread #1, queue = 'com.apple.main-thread', stop reason = breakpoint 1.1
  * frame #0: 0x00000001074e29ee duckdb`duckdb::TaskScheduler::SetThreadsInternal(this=0x00006060000015e0, n=12) at task_scheduler.cpp:239:4
    frame #1: 0x00000001074e5335 duckdb`duckdb::TaskScheduler::SetThreads(this=0x00006060000015e0, n=12) at task_scheduler.cpp:199:2
    frame #2: 0x0000000107099f45 duckdb`duckdb::DatabaseInstance::Initialize(this=0x0000616000000698, database_path=0x0000000000000000, user_config=0x00007ff7bfefd420) at database.cpp:159:13
    frame #3: 0x000000010709f2ce duckdb`duckdb::DuckDB::DuckDB(this=0x0000602000000a90, path=0x0000000000000000, new_config=0x00007ff7bfefd420) at database.cpp:170:12
    frame #4: 0x000000010709f689 duckdb`duckdb::DuckDB::DuckDB(this=0x0000602000000a90, path=0x0000000000000000, new_config=0x00007ff7bfefd420) at database.cpp:169:100
    ...
后台线程启动后的主逻辑在 TaskScheduler::ExecuteForever() 中,在每个后台线程的生命周期内,它们会不停从 TaskScheduler 的公共队列中取出 Task,调用 Task::Execute() 函数完成 Task 的执行:
void TaskScheduler::ExecuteForever(atomic<bool> *marker) {
#ifndef DUCKDB_NO_THREADS
    unique_ptr<Task> task;
    // loop until the marker is set to false
    while (*marker) {
        // wait for a signal with a timeout
        queue->semaphore.wait();
        if (queue->q.try_dequeue(task)) {
            task->Execute(TaskExecutionMode::PROCESS_ALL);
            task.reset();
        }
    }
#else
    throw NotImplementedException("DuckDB was compiled without threads! Background thread loop is not allowed.");
#endif
}
Pipeline 的各个 Task 就是这样被后台线程并发执行的。要想控制 Pipeline 之间的执行顺序和 Pipeline 内的并发度,只需要设计和控制好各个 ExecutorTask 入队的顺序即可。Pipeline 的执行主要依靠 ExecutorTask,各个算子如果需要自定义计算逻辑和调度规则也是通过实现新的 ExecutorTask 完成。
4. ExecutorTask 和 Event 驱动的调度模型 #
在 Task 的执行框架内,后台线程会通过 ExecutorTask::Execute() 驱动当前 ExecutorTask 的执行。为了给各个 Pipeline 和 PhysicalOperator 提供灵活的执行方式,DuckDB 内各个 PhysicalOperator 可以各自实现特定的 ExecutorTask 用于完成自身特殊的计算任务和后续 Pipeline Task 的计算调度。ExecutorTask::Execute() 的执行会直接调用子类的 ExecutorTask::ExecuteTask() 函数完成当前 ExecutorTask 的实际执行。
对于一般的 Pipeline 来说,会构造一个叫 PipelineTask 的 ExecutorTask 子类。PipelineTask::ExecuteTask() 的代码逻辑如下:
TaskExecutionResult ExecuteTask(TaskExecutionMode mode) override {
    if (!pipeline_executor) {
        pipeline_executor = make_unique<PipelineExecutor>(pipeline.GetClientContext(), pipeline);
    }
    if (mode == TaskExecutionMode::PROCESS_PARTIAL) {
        bool finished = pipeline_executor->Execute(PARTIAL_CHUNK_COUNT);
        if (!finished) {
            return TaskExecutionResult::TASK_NOT_FINISHED;
        }
    } else {
        pipeline_executor->Execute();
    }
    event->FinishTask();
    pipeline_executor.reset();
    return TaskExecutionResult::TASK_FINISHED;
}
在 PipelineTask::ExecuteTask() 中,通过 PipelineExecutor::Execute() 完成当前 ExecutorTask 的执行后它会去调用 Event::FinishTask() 函数进行 ExecutorTask 完成后各个 Event 子类自定义的收尾工作,在 Event::FinishTask() 函数如果发现当前 Event 的所有 Task 都执行完毕就会清理当前 Event 相关内容,并调用父亲 Event 的 CompleteDependency():
void Event::Finish() {
    D_ASSERT(!finished);
    FinishEvent();
    finished = true;
    // finished processing the pipeline, now we can schedule pipelines that depend on this pipeline
    for (auto &parent_entry : parents) {
        auto parent = parent_entry.lock();
        if (!parent) { // LCOV_EXCL_START
            continue;
        } // LCOV_EXCL_STOP
        // mark a dependency as completed for each of the parents
        parent->CompleteDependency();
    }
    FinalizeFinish();
}
在 Event::CompleteDependency() 中,如果发现所有 dependency Event 都已经执行完毕,则会开始调度执行父亲 Event 的 Task。如果父亲 Event 没有 task 需要执行,则会再调用父亲 Event 的 Finish() 函数直接在当前线程中完成父亲 Event 的执行和收尾:
void Event::CompleteDependency() {
    idx_t current_finished = ++finished_dependencies;
    D_ASSERT(current_finished <= total_dependencies);
    if (current_finished == total_dependencies) {
        // all dependencies have been completed: schedule the event
        D_ASSERT(total_tasks == 0);
        Schedule();
        if (total_tasks == 0) {
            Finish();
        }
    }
}
从上面代码可以看到 Event 调度 Task 是通过 Event::Schedule() 函数完成的,这是个 Event 的纯虚函数,不同的子类 Event 需要自行实现。Pipeline 执行过程中使用的 Event 类型不多,最常见的是:
- PipelineInitializeEvent:主要用来初始化当前 Pipeline 的 sink,会调度 1 个 PipelineInitializeTask
- PipelineEvent:主要用来表示 Pipeline 的执行操作,可能会调度多个 ExecutorTask 到执行队列中。PipelineEvent 的 Schedule() 函数主要调用 Pipeline::Schedule() 完成 ExecutorTask 的计算调度,这里不再展开,感兴趣的朋友们可以继续追踪代码看看其中的实现细节
- PipelineFinishEvent:主要用来标记当前 Pipeline 执行结束,在 Event::Finish() 检测到当前 Event 结束,调用到 PipelineFinishEvent::FinishEvent() 时完成 Pipeline::Finalize(),用来做 Pipeline 的清理操作
- PipelineCompleteEvent:用来更新 Executor 中已结束的 Pipeline 的 counter completed_pipelines,Executor 主线程会不断检测 completed_pipelines,当发现所有中间 Pipeline 都执行完后,主线程会开始执行 root Pipeline,返回结果给客户端。
我们在上面 Executor::InitializeInternal() 的函数中看到,DuckDB 的 Pipeline 分为了 2 部分:
- 中间 Pipelines:包含所有除了 root 以外的 Pipeline。DuckDB 基于这些 Pipeline 之间的依赖关系构建了相应的 Event DAG,通过调度最底层没有任何依赖 Event 的 ExecutorTask 初始化了 TaskScheduler 的执行队列,进而催动了所有中间 Pipeline 的执行。
- root Pipelines:在构建 Event DAG 的时候不会将这部分 Pipeline 考虑进去,这部分 Pipeline 也不会被 TaskScheduler 启动的后台线程异步执行。在完成中间 Pipeline 的初始调度后,主线程后续的工作和 root Pipeline 的执行过程我们在后面的小结来看。
Pipeline 的初始调度正是由主线程执行 Executor::ScheduleEvents() 触发的,正式的调度逻辑是由 Executor::ScheduleEventsInternal() 完成的,这个函数的大致逻辑如下。概括来说就是寻找没有任何 dependency 的 Event,通过执行这些 Event.Schedule() 构造 ExecutorTask,放入 TaskScheduler 的工作队列,激活后台工作线程,开始 Pipeline 执行以及其他 Event 和 ExecutorTask 的连锁反应:
void Executor::ScheduleEventsInternal(ScheduleEventData &event_data) {
    auto &events = event_data.events;
    D_ASSERT(events.empty());

    // create all the required pipeline events
    for (auto &pipeline : event_data.meta_pipelines) {
        SchedulePipeline(pipeline, event_data);
    }

    // set up the dependencies across MetaPipelines
    auto &event_map = event_data.event_map;
    for (auto &entry : event_map) {
        auto pipeline = entry.first;
        for (auto &dependency : pipeline->dependencies) {
            auto dep = dependency.lock();
            D_ASSERT(dep);
            auto event_map_entry = event_map.find(dep.get());
            D_ASSERT(event_map_entry != event_map.end());
            auto &dep_entry = event_map_entry->second;
            D_ASSERT(dep_entry.pipeline_complete_event);
            entry.second.pipeline_event->AddDependency(*dep_entry.pipeline_complete_event);
        }
    }

    // verify that we have no cyclic dependencies
    VerifyScheduledEvents(event_data);

    // schedule the pipelines that do not have dependencies
    for (auto &event : events) {
        if (!event->HasDependencies()) {
            event->Schedule();
        }
    }
}
5. PipelineExecutor 和 Pipeline 内基于 Push 的执行模型 #
PipelineExecutor::Execute() 函数通过调用 Pipeline 中各个 PhysicalOperator 的相应接口,以 Push 的方式完成了当前 Pipeline 的执行,执行逻辑可以概括为:
- 先调用 FetchFromSource() 从 Pipeline 的 source PhysicalOperator 中获取计算结果作为 source DataChunk,这里会调用 source 的 GetData() 接口。
- 再调用 ExecutePushInternal() 依次执行 Pipeline 中 operators 列表中的各个 PhysicalOperator 和最后一个 sink PhysicalOperator 完成这批数据后续的所有计算操作。对于普通 operator 会调用它的 Execute() 接口,对最后的 sink 会调用它的 Sink() 接口。PipelineExecutor::ExecutePushInternal() 可以看做是 Pipeline 内的数据消费者。
- 最后调用 PushFinalize() 完成当前 ExecutorTask 的执行,这里会调用 sink 的 Combine 接口,用以完成一个 ExecutorTask 结束后的收尾清理工作。
bool PipelineExecutor::Execute(idx_t max_chunks) {
    D_ASSERT(pipeline.sink);
    bool exhausted_source = false;
    auto &source_chunk = pipeline.operators.empty() ? final_chunk : *intermediate_chunks[0];
    for (idx_t i = 0; i < max_chunks; i++) {
        if (IsFinished()) {
            break;
        }
        source_chunk.Reset();
        FetchFromSource(source_chunk);
        if (source_chunk.size() == 0) {
            exhausted_source = true;
            break;
        }
        auto result = ExecutePushInternal(source_chunk);
        if (result == OperatorResultType::FINISHED) {
            D_ASSERT(IsFinished());
            break;
        }
    }
    if (!exhausted_source && !IsFinished()) {
        return false;
    }
    PushFinalize();
    return true;
}
PhysicalOperator 同时包含了 source、operator、sink 所需要的所有接口,各个 PhysicalOperator 需要实现对应的接口完成相应的计算逻辑。比如 partitioned hash join 因为会分成 3 个阶段分别作为 sink、operator 和 source 角色,它同时实现了所有的接口。
6. 主线程和 root Pipeline 的执行 #
root Pipelines 比较特殊:在构建 Event DAG 的时候不会将这部分 Pipeline 考虑进去,这部分 Pipeline 也不会被 TaskScheduler 启动的后台线程异步执行,这部分 Pipeline 要想得到执行也需要等待所有中间 Pipeline 执行结束。
root Pipeline 的执行是主线程通过调用 PipelineExecutor 的 Execute 函数完成的。主线程通过 TaskScheduler 启动的多个后台线程,通过 Event 触发和调度新一轮 Pipeline 的 ExecutorTask,Pipeline 就能够被后台执行了。剩下的问题就是主线程如何知道中间 Pipeline 执行结束,以及如何执行 root Pipeline 拿到最终结果返回给客户端。另外各个 Pipeline 在异步执行过程中可能会遇到一些 ERROR,主线程如何及时知道这些 ERROR 并返回给客户端也是需要处理的一个问题。
主线程完成中间 Pipeline 的初始调度后,因为 root Pipeline 在中间结果没有准备好之前也不能计算,这时为了加速查询的执行最好的办法就是主线程也参与到中间 Pipeline 的执行当中去。我们看到主线程会停留在 PendingQueryResult::ExecuteInternal() 的 while 循环这里:
unique_ptr<QueryResult> PendingQueryResult::ExecuteInternal(ClientContextLock &lock) {
    CheckExecutableInternal(lock);
    while (ExecuteTaskInternal(lock) == PendingExecutionResult::RESULT_NOT_READY) {
    }
    if (HasError()) {
        return make_unique<MaterializedQueryResult>(error);
    }
    auto result = context->FetchResultInternal(lock, *this);
    Close();
    return result;
}
PendingQueryResult::ExecuteTaskInternal() 经过几次函数调用后最终会来到 PipelineExecutor::Execute() 函数。这个函数初始一看可能会比较绕,但想要实现的功能是:
- 在所有中间 Pipeline 没有执行完之前一直和后台线程一起参与计算:如果从队列中取出来了一个 ExecutorTask 就尝试调用它的 Execute(TaskExecutionMode::PROCESS_PARTIAL) 函数完成小批量数据的计算,现在默认是 50 个 DataChunk。
- 如果所有 Pipeline 都执行完了,此时 completed_pipelines 与 total_pipelines(记录中间 Pipeline 的数量,不包含 root Pipeline)相等,Executor 会释放所有中间 Pipeline,标记 execution_result 为PendingExecutionResult::RESULT_READY。
在这个小 while 循环中,如果没有取到 task,或者执行了 Task 的小部分任务后,都会去检测其他线程执行过程中是否有 Error 产生,用户是否 cancel 了 query 等等,一旦遇到错误产生,就会分别通过 CancelTasks() 和 ThrowException() 取消后台异步 Task 的执行并将错误抛给主线程的上层。
PendingExecutionResult Executor::ExecuteTask() {
    if (execution_result != PendingExecutionResult::RESULT_NOT_READY) {
        return execution_result;
    }
    // check if there are any incomplete pipelines
    auto &scheduler = TaskScheduler::GetScheduler(context);
    while (completed_pipelines < total_pipelines) {
        // there are! if we don't already have a task, fetch one
        if (!task) {
            scheduler.GetTaskFromProducer(*producer, task);
        }
        if (task) {
            // if we have a task, partially process it
            auto result = task->Execute(TaskExecutionMode::PROCESS_PARTIAL);
            if (result != TaskExecutionResult::TASK_NOT_FINISHED) {
                // if the task is finished, clean it up
                task.reset();
            }
        }
        if (!HasError()) {
            // we (partially) processed a task and no exceptions were thrown
            // give back control to the caller
            return PendingExecutionResult::RESULT_NOT_READY;
        }
        execution_result = PendingExecutionResult::EXECUTION_ERROR;

        // an exception has occurred executing one of the pipelines
        // we need to cancel all tasks associated with this executor
        CancelTasks();
        ThrowException();
    }
    D_ASSERT(!task);

    lock_guard<mutex> elock(executor_lock);
    pipelines.clear();
    NextExecutor();
    if (HasError()) { // LCOV_EXCL_START
        // an exception has occurred executing one of the pipelines
        execution_result = PendingExecutionResult::EXECUTION_ERROR;
        ThrowException();
    } // LCOV_EXCL_STOP
    execution_result = PendingExecutionResult::RESULT_READY;
    return execution_result;
}
一旦 execution_result 的状态变为 RESULT_READY,就意味着我们结束了所有中间 Pipeline 的执行,Executor::ExecuteTask() 会一直返回 RESULT_READY,最外层的 for 循环也会退出,从而进入下一阶段,也就是执行 root Pipeline。root Pipeline 被 Executor 所持有,它的执行也是在 Executor::FetchChunk() 中完成的:
unique_ptr<DataChunk> Executor::FetchChunk() {
    D_ASSERT(physical_plan);

    auto chunk = make_unique<DataChunk>();
    root_executor->InitializeChunk(*chunk);
    while (true) {
        root_executor->ExecutePull(*chunk);
        if (chunk->size() == 0) {
            root_executor->PullFinalize();
            if (NextExecutor()) {
                continue;
            }
            break;
        } else {
            break;
        }
    }
    return chunk;
}
虽然从函数名来看 Executor 调用了 Pipeline::ExecutePull() 函数,但其实这个函数内部实现仍旧是 push 的方式,先从 source 拿到一批数据,然后再依次的经过所有 operators 的计算得到最终结果。
7. Pipeline 的构造 #
Pipeline 的执行框架我们已经大概了解,最后一个问题就是 PhysicalOperator tree 是如何转换成 Pipeline DAG 的了。Pipeline 主要由 source、operators 和 sink 这三部分构成,从物理执行计划划分 Pipeline 第一个遇到的问题是如何确定 Pipeline 的 sink 和 source。
DuckDB 采用了和 Hyper 一样的 Pipeline breaker 定义:那些需要消化掉所有孩子节点的数据后才能进行下一步计算输出结果的算子。典型的比如构造 hash join 或 hash aggregate 的 hash table,或者 sort 和 TopN 算子的排序操作,需要完全消费掉孩子节点的数据 后,才能得到正确结果进行下一阶段的数据。
算子的具体实现决定了 Pipeline 的构造。物理执行计划转成 Pipeline 是由其中的各个 PhysicalOperator 完成的,几个关键函数:
- Executor::InitializeInternal():把物理执行计划(PhysicalOperator tree)转成 Pipeline 的入口,所有构造出来的 Pipeline 都存储在该查询的 Executor 中。
- PhysicalOperator::BuildPipelines():构造 Pipeline 的是通过 top down 的遍历 PhysicalOperator tree 完成的,Pipeline 的 sink 会先被确定下来(要么是整个物理执行计划的根节点,要么是上一个 Pipeline 的 source 节点)。Executor 通过该函数遍历每个 PhysicalOperator,决定将其加入当前 Pipeline 的 operators 列表还是做为当前 Pipeline 的 source。遇到当前 Pipeline 的 source 时就需要结束构造当前 Pipeline 了,然后将该 source 作为下一个 Pipeline 的 sink,继续 top down 的遍历 PhysicalOperator tree 和构造新的 Pipeline。
- PhysicalOperator::BuildChildPipeline():切分 Pipeline,构造 Pipeline 之间的依赖关系。
PhysicalOperator::BuildPipelines() 是个虚函数,搜索代码可以看到,像 PhysicalJoin、PhysicalRecursiveCTE、PhysicalUnion 这些有多个孩子节点的以及一些比较特殊的算子都重载了这个虚函。其他没有重载该函数的算子,默认的 BuildPipelines() 函数如下:
void PhysicalOperator::BuildPipelines(Pipeline ¤t, MetaPipeline &meta_pipeline) {
op_state.reset();
auto &state = meta_pipeline.GetState();
if (IsSink()) {
// operator is a sink, build a pipeline
sink_state.reset();
D_ASSERT(children.size() == 1);
// single operator: the operator becomes the data source of the current pipeline
state.SetPipelineSource(current, this);
// we create a new pipeline starting from the child
auto child_meta_pipeline = meta_pipeline.CreateChildMetaPipeline(current, this);
child_meta_pipeline->Build(children[0].get());
} else {
// operator is not a sink! recurse in children
if (children.empty()) {
// source
state.SetPipelineSource(current, this);
} else {
if (children.size() != 1) {
throw InternalException("Operator not supported in BuildPipelines");
}
state.AddPipelineOperator(current, this);
children[0]->BuildPipelines(current, meta_pipeline);
}
}
}
PhysicalOperator::BuildPipelines() 不仅构建了 PhysicalOperator 和 Pipeline 的关系,也构建了 Pipeline 之间的依赖关系:如果某个 PhysicalOperator 是 Pipeline breaker,那么它不仅会作为当前 Pipeline 的 source,也会作为下一个 Pipeline 的 sink,Pipeline breaker 算子隐含了 Pipeline 之间的计算先后关系,只有上游 Pipeline 完全完成计算后才能开启下游 Pipeline 的计算。
一个简单的单表聚合为例,它的执行计划和对应的 Pipeline 可以表示成下图,其中 Pipeline 1 依赖 Pipeline 2:

7.1. 从 PhysicalUnion 构造 Pipeline #
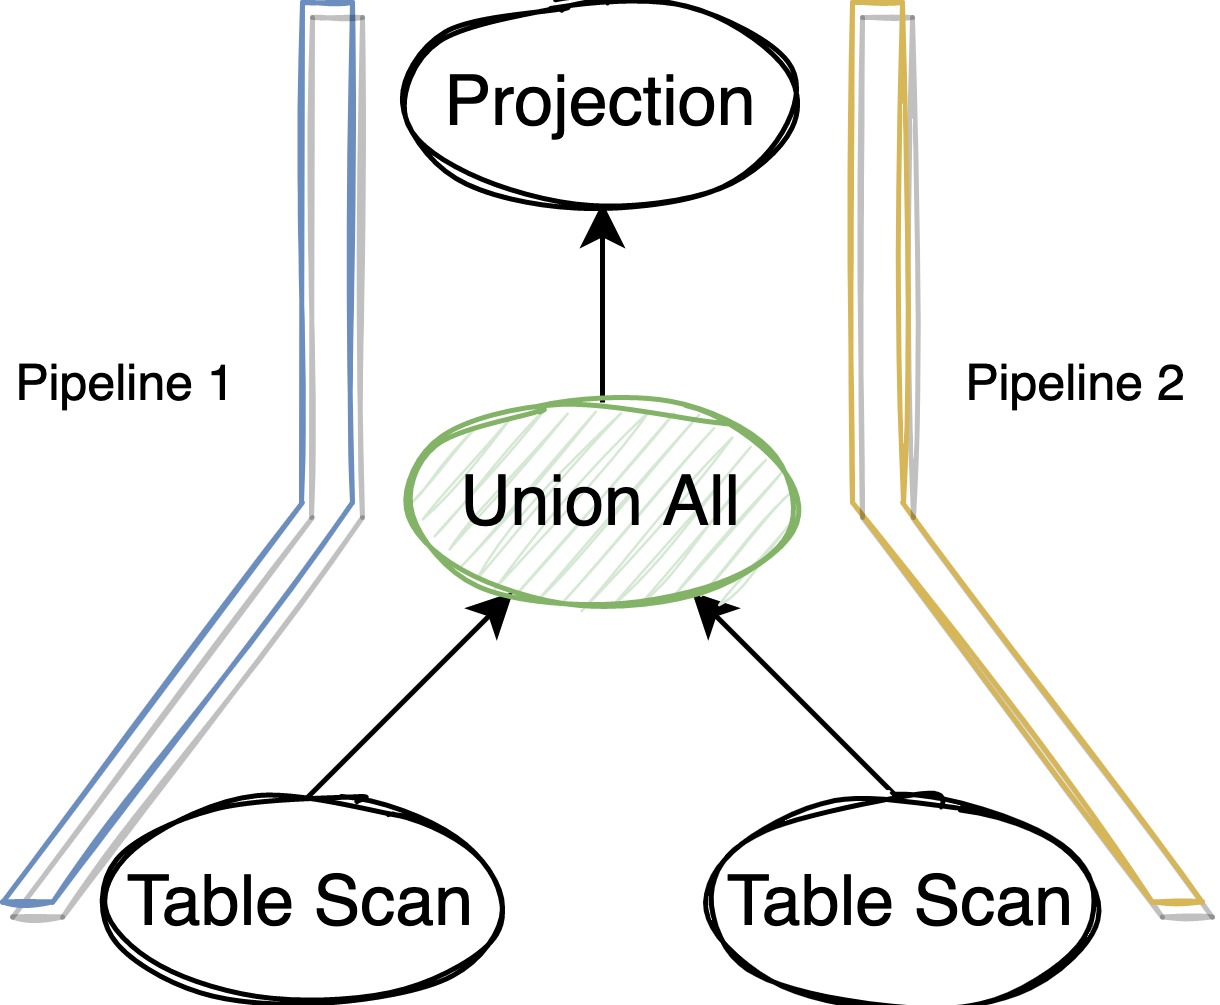
我们以 Union All 为例介绍一个稍微复杂有多个 child 的情况。DuckDB 的 Union All 用 PhysicalUnion 来表示,每个 PhysicalUnion 有 2 个孩子节点。如果用户 SQL 中有 N 个表 Union All,那么就会构造出 N-1 个 PhysicalUnion 算子。PhysicalUnion 仅仅用来汇总多个数据源,传递孩子节点的数据给它的父节点完成计算。
PhysicalUnion 有多个 child 数据源,意味着 PhysicalUnion 往下 top down 构造 Pipeline 的时候需要分别给各个孩子节点传递不同的 Pipeline,那这 2 个 Pipeline 的 sink 应该是什么呢。考虑到 PhysicalUnion 没有计算逻辑仅汇总数据的特殊性,DuckDB 让这 2 个 Pipeline 共享当前传递过来的 Pipeline 的 sink 和当前的 operators 列表,然后各自在自己的 operators 列表中新增自己的算子,设置自己的 sink。
这样的 Pipeline 分裂可以使 PhysicalUnion 父节点的计算逻辑和对应的中间状态在这 2 个 Pipeline 之间复用,虽然 PhysicalUnion 孩子节点的计算逻辑位于不同 Pipeline 之间各自独立产生计算结果,但 PhysicalUnion 之后的计算逻辑和中间状态在不同 Pipeline 之间是共用的,可以确保计算的正确性。
不过这样的 Pipeline 构造带来了额外的问题,我们上面提到 Pipeline breaker 确定了 Pipeline 之间的计算调度关系,并且每个 Pipeline 还可以独立设置自己的并发度。对于 PhysicalUnion 所处的 Pipeline 来说,这个 Pipeline 的 sink 同时属于多个 Pipeline(PhysicalUnion 分裂出来的),只有这些 Pipeline 都完成执行后才能执行他们的下游 Pipeline。所以后面在 Pipeline 调度的时候这里还需要特殊处理下。
一个简单的 UNION ALL 为例,它的执行计划和对应的 Pipeline 可以表示成下图:
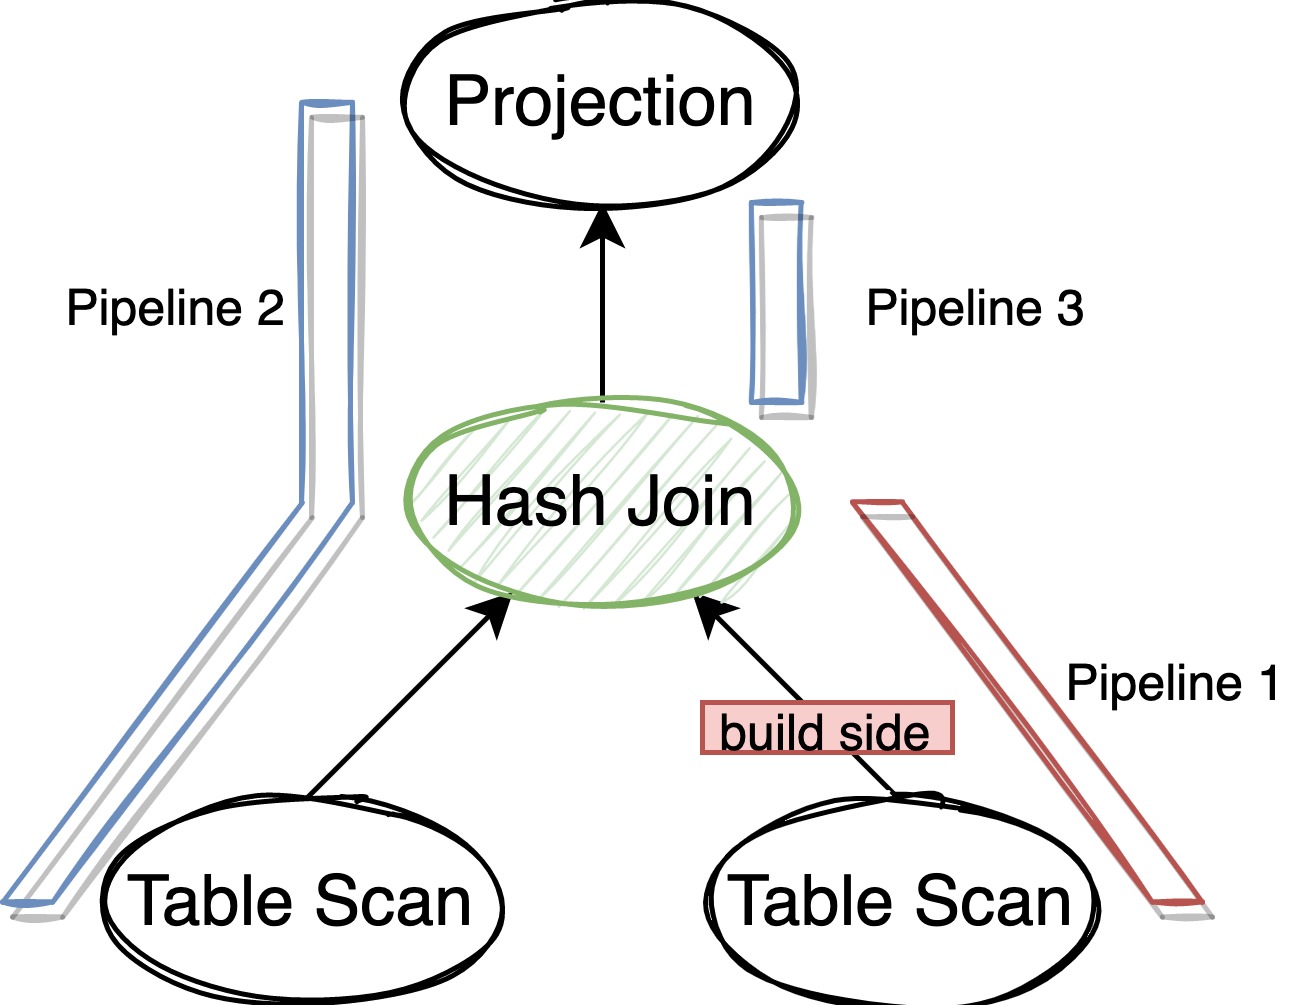
7.2. 从 PhysicalJoin 构造 Pipeline #
理解了 Union All 的 Pipeline 构造,我们再来看看稍微复杂点的 Join。PhysicalJoin 的 Pipeline 构造相对来说要复杂一点,需要我们先大致了解下 DuckDB 中 PhysicalJoin 的实现。
DuckDB 的 Hash Join 采用了 partitioned hash join,当数据量比较大的时候可以通过 repartition 将数据落盘避免 OOM,这个多线程版本的 partitioned hash join,主要分为 3 个阶段:
- 并发读取和计算所有 build 端的数据,当所有数据都读完后检查总数据量是否能全部放在内存中,如果不能就将 build 端的数据 repartition,选出第一批能放在内存中的 partition 为它们构造 hash table,剩下的数据存放在磁盘上。
- 并发读取和计算所有 probe 端的数据,这时读上来的数据要么属于内存中的 partition,要么属于磁盘上的 partition,先把属于磁盘上的 partition 的数据落盘,用属于内存中的 partition 的数据去 probe 此时 build 端的放在内存中的 hash table,得到结果返回给上层。
- 并发处理磁盘上的数据:挑选一批 build 端能放入内存的 partition,构造 hash table,然后 probe 端去并发的 probe 得到结果进行下一步计算。循环这样的处理过程直到所有磁盘上的 partition 都 join 完成。
这 3 个过程也分别对应了 3 个基本的 Pipeline,可以表示成下图,其中 Pipeline 2 依赖 pipeline 1,Pipeline 3 依赖 Pipeline 2:
8. DuckDB 执行模式的一些感受和思考 #
8.1. 计算调度的复杂性 #
这是一个最直观的感受。相比 Pull 模型,Push 模型在实现时需要多考虑如何控制 Pipeline 的计算调度,也需要考虑一个 Pipeline 内数据消费速度的问题(这个我们还没在本文涉及),这些代码增加了工程实现的复杂度,也增加了问题诊断的复杂度。
8.1. PipelineBreaker 的作用 #
我喜欢把计算抽象为数据和计算两个部分,就像 CPU 的 L1 Cache 分为 L1D 和 L1I 一样,之前思考 Pipeline breaker 的时候更多是从计算性能角度,这次在思考 Pipeline 之间的依赖关系和 ExecutorTask 的调度时才意识到这个容易被忽略的地方:Pipeline 其实也反应了两个比较大的计算过程之间的先后关系。这个关系在 Volcano 模型的 Pull 中没有那么明显,只是写代码时为了保证正确性其实会应用这些依赖关系,比如 hash join 在 build side 没有结束时就不会对外返回结果。
8.3. 除了带来性能提升外,这种并发 Push 执行模型还有其他优势吗? #
从数据库、数据仓库执行引擎的经验来看,遇到最多的线上问题可以分为两类:查询跑的慢并发,以及查询吃的内存太狠导致查询自己或者进程 OOM。DuckDB 因为有了基于 ExecutorTask 的计算调度机制,我们就有机会从源头来控制:如果内存或 CPU 资源有限就少调度些 ExecutorTask 来执行。这样至少能够把查询失败的问题变成查询变慢的问题,然后查询变慢的时候再去看资源使用率满不满,这样至少能守住服务可用性的 SLO,也比较符合一般的问题排查思路。
9. 参考材料 #
- issues/1583 Move to push-based execution model
- Push-Based Execution in DuckDB, by Mark Raasveldt: slides, video